


Coconut Cake with Almond Mascarpone Buttercream: A Festive Blend of Tropical Flavors and Holiday Elegance
Article published on:
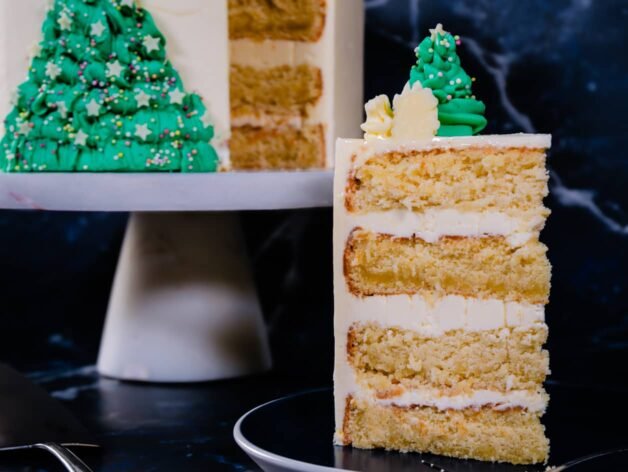
A festive 4-layer Coconut Cake with silky Almond Mascarpone Buttercream, blending tropical flavors and creamy indulgence for any special occasion.
Moist Coconut Sponge Layers with Almond-Infused Mascarpone Buttercream – A Stunning Dessert for Your Holiday Table
Coconut and almond might not be the first flavors that come to mind when you think of Christmas, but trust me—they deserve a spot at the festive table. With its soft, coconut-infused sponge layers and silky almond mascarpone buttercream, this cake brings a touch of tropical warmth to the season’s chill.
Inspired by the vibrant desserts of Brazil and paired with a classic Swiss Meringue Buttercream, this recipe isn’t just about creating a beautiful cake; it’s about sharing a slice of something special with those you love. Whether it’s served as the centerpiece of a holiday feast or enjoyed quietly with a cup of coffee the next morning, every bite tells a story of balance—rich yet light, indulgent yet refreshing.
A Personal Touch: Bringing a Taste of Brazil to Our Holiday Table
When planning this cake, I had one goal: to create a dessert that would feel special, not just for the season, but for my husband. He’s from Brazil, and Christmas away from home can be a little bittersweet.
In Brazil, coconut is a dessert staple—from silky puddings to chewy coconut truffles (beijinhos). It’s a flavor that carries memories of home, family gatherings, and warm festive evenings. Pairing it with a smooth almond-flavored mascarpone buttercream felt like the perfect way to honor those traditions while adding a touch of elegant flair.
The result isn’t just a cake; it’s a thoughtful blend of flavors that bridges the gap between two homes. Judging by his smile after the first bite, I’d say it hit the mark.
Now, let’s get into the recipe so you can bring a little tropical warmth to your holiday table, too!
Key Ingredients and Their Role in the Recipe
Every layer and every flavor in this cake serves a purpose. Here’s why these ingredients matter:
For the Coconut Sponge:
- Desiccated Coconut: Adds a subtle texture and deep coconut flavor to the sponge.
- Coconut Cream: Keeps the sponge incredibly moist and enhances the tropical profile.
- Butter and Oil: The combination gives the sponge a tender crumb without sacrificing structure.
- Eggs: Act as a binding agent, adding richness and stability.
For the Almond Mascarpone Buttercream:
- Butter: Forms a stable and creamy base for the buttercream, ensuring it holds its shape for layering and decorating.
- Mascarpone: Introduces lightness and a creamy tang, balancing the richness of the butter and adding a luxurious texture.
- Almond Extract: A subtle touch that elevates the flavor profile, providing a warm, nutty note without overpowering the overall taste.
- Coconut Milk: Adds a gentle tropical aroma and creaminess, tying the buttercream flavor seamlessly back to the coconut sponge layers.
- Egg Whites: The foundation of Swiss Meringue Buttercream—they provide structure, stability, and a silky texture. When whipped with sugar, egg whites create a light and airy meringue that serves as the perfect base for incorporating butter and mascarpone.
Each ingredient in this buttercream has a crucial role, working together to create a frosting that is not only smooth and stable but also delicate and flavorful, making it ideal for both layering and decorating this festive coconut cake.
Each ingredient works in harmony to create a cake that’s flavorful, balanced, and structurally sound.
Techniques for a Perfect Coconut Cake with Almond Mascarpone Buttercream
Achieving a flawless Coconut Cake with Almond Mascarpone Buttercream requires a few key techniques. Follow these tips for the best results:
- Room-Temperature Ingredients: Ensure your butter, eggs, and mascarpone are at room temperature. This helps achieve a smooth batter and buttercream without curdling or splitting.
- Sift the Dry Ingredients: Always sift the flour and salt before adding them to the wet ingredients. This prevents lumps and ensures even distribution of raising agents.
- Don’t Overmix the Batter: Once the dry ingredients are added, mix on low speed just until incorporated. Overmixing can lead to a dense, tough sponge.
- Add Butter Gradually to the Meringue: When making Swiss Meringue Buttercream, add softened butter one cube at a time and wait for each piece to fully incorporate before adding the next.
- Handle Mascarpone Gently: Mascarpone should be added at the end and on low speed to avoid splitting the buttercream.
- Chill Between Steps: Allow the crumb coat to set in the refrigerator before applying the final layer of buttercream. This ensures clean edges and a stable structure.
These techniques will set the foundation for a stable, visually appealing cake with perfect texture and flavor.
Step-by-Step Guide to Making a 4-Layer Coconut Cake with Almond Mascarpone Buttercream
Creating a stunning 4-layer Coconut Cake with Almond Mascarpone Buttercream requires precision and attention to detail. Each step in this guide is broken down into clear, actionable sections to help you confidently bake, assemble, and decorate your festive masterpiece.
Step 1: Preheat the Oven and Prepare the Cake Pans
Preheat your oven to 340°F (170°C). Prepare four 8-inch (20 cm) round cake pans by lightly greasing them with butter or baking spray. Line the bottoms with parchment paper to prevent sticking. If you don’t have four pans, bake in batches, making sure to clean and re-prep the pans between each bake.
Ensuring your pans are well-prepared will make removing the cake layers clean and easy, so take your time with this step. A properly preheated oven is equally important for even baking, so give it time to reach the correct temperature.
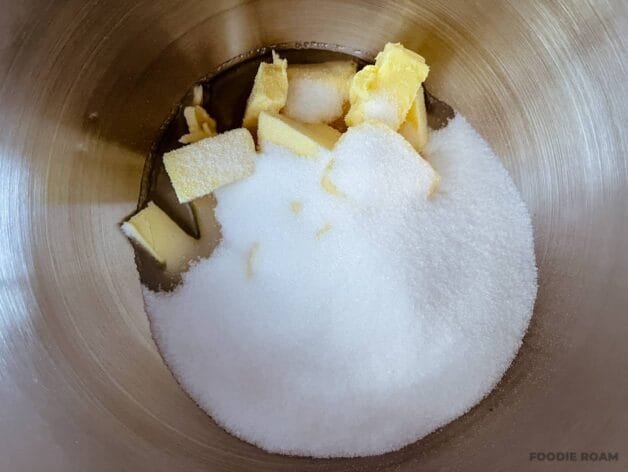
Step 2: Cream the Butter, Oil, and Sugar
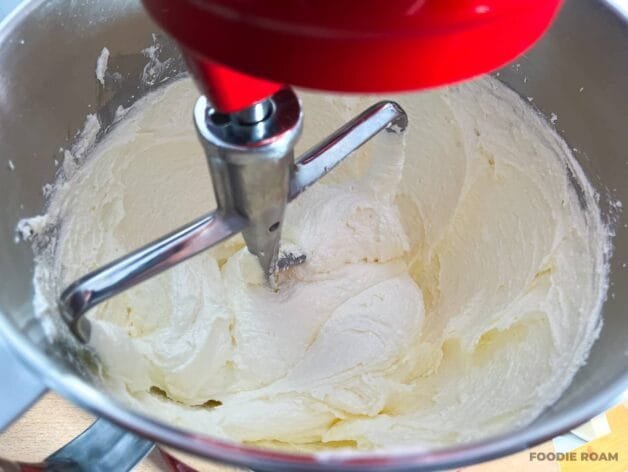
In the bowl of a stand mixer fitted with the paddle attachment, combine 1½ cups unsalted butter (330 g), ⅔ cup vegetable oil (135 g), and 2½ cups caster sugar (500 g). Beat the mixture on medium-high speed for about 4–5 minutes, or until it becomes pale, light, and fluffy.
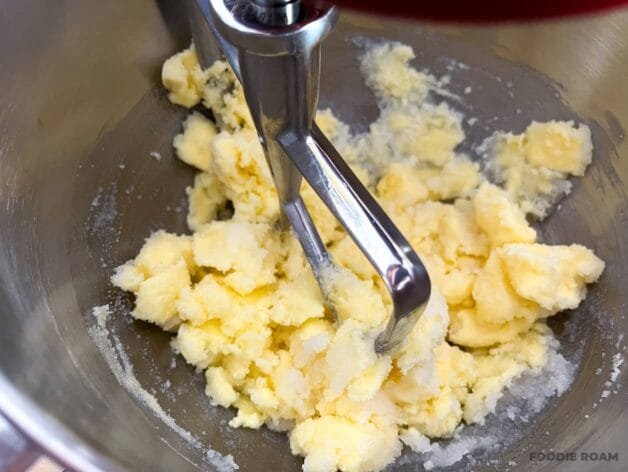
Scrape down the sides of the bowl with a spatula halfway through to ensure everything is evenly mixed. Proper creaming introduces air into the batter, resulting in a tender and airy sponge. Don’t rush this process—it’s the foundation of your cake’s texture.
Step 3: Add the Eggs One at a Time
Reduce the mixer speed to medium and add 8 large eggs (room temperature), one at a time. Make sure each egg is fully incorporated before adding the next. If the mixture looks slightly curdled as you add the eggs, don’t worry—this will resolve once the dry ingredients are added.
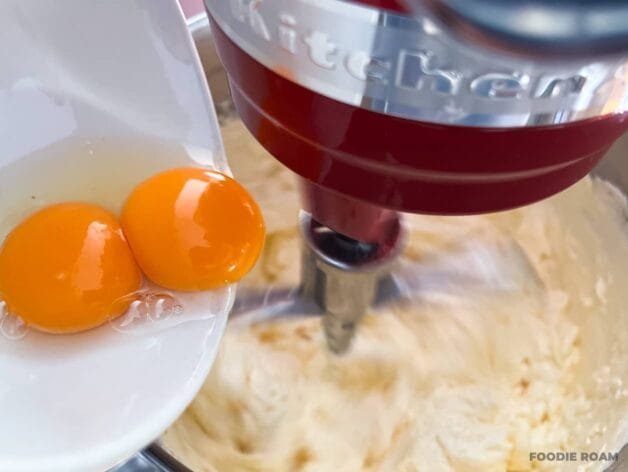
Room-temperature eggs are essential because they emulsify better with the butter and sugar, preventing any splitting or uneven mixing.
Step 4: Mix the Dry Ingredients and Coconut Cream
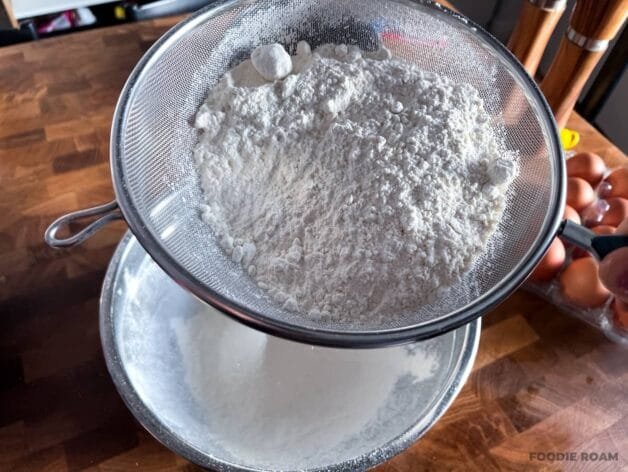
Start by sifting 3¼ cups of self-raising flour (400 g) and a pinch of salt into a large bowl. Sifting aerates the flour, removes any lumps, and ensures an even distribution of the raising agents, which is essential for a light and tender sponge.
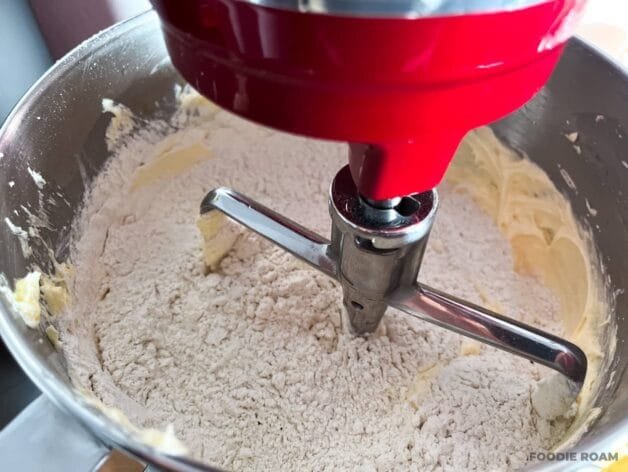
Add the sifted flour and salt directly into the butter, sugar, and egg mixture in the stand mixer. Next, add 2 cups of desiccated coconut (200 g) to the same bowl. Using the mixer on low speed, gently mix until the dry ingredients are just incorporated. Take care not to overmix, as this can activate the gluten in the flour and result in a dense sponge.
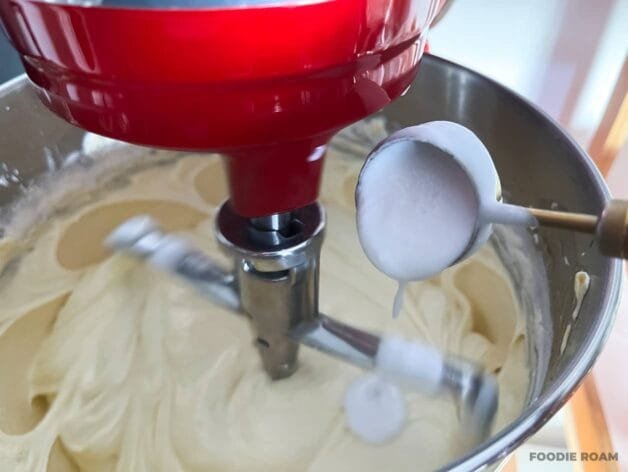
Once the dry ingredients and coconut are evenly distributed, gradually add 10 tablespoons coconut cream (150 ml) and ½ teaspoon vanilla extract while continuing to mix on low speed. Pour the liquid ingredients slowly to ensure they integrate smoothly into the batter without causing it to split.
Mix until everything is just combined—stop as soon as the batter looks smooth and uniform. Overmixing at this stage can affect the final texture of the cake. The finished batter should be thick, smooth, and well-integrated, with no visible streaks of flour or coconut cream.
Use a spatula to scrape down the sides and bottom of the mixing bowl to ensure every bit of the batter is evenly mixed. Your batter is now ready to be divided into the prepared cake pans.
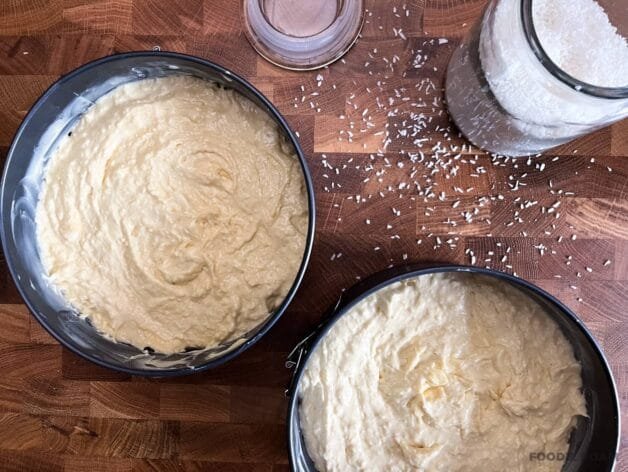
Step 5: Divide and Bake the Cake Layers
Evenly divide the batter among the four prepared pans. Use an offset spatula to level the tops, ensuring the batter is spread evenly across each pan.
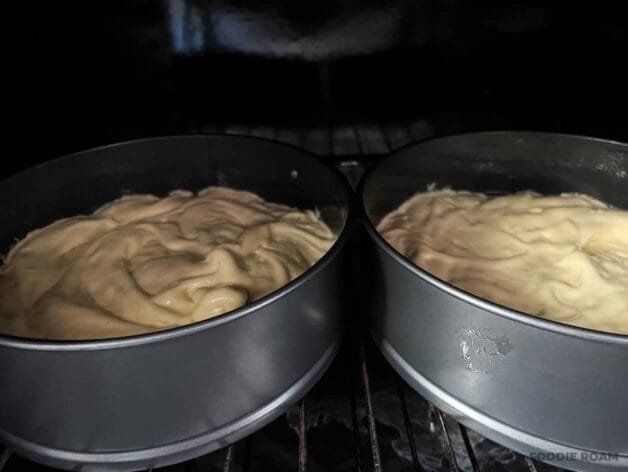
Place the pans into the preheated oven and bake for 20–25 minutes, or until a toothpick inserted into the center comes out clean. Rotate the pans halfway through baking if your oven has hot spots to ensure even cooking.
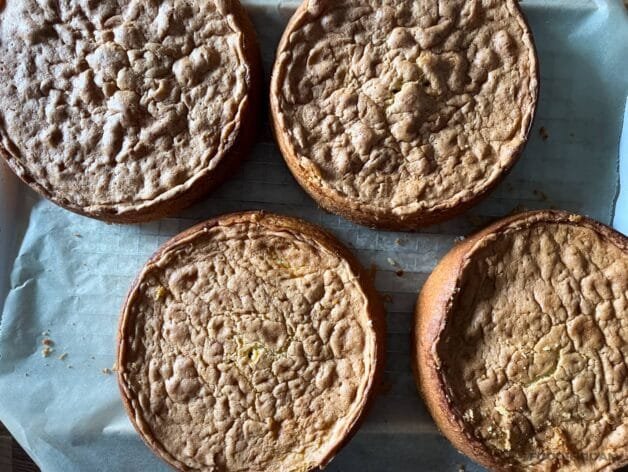
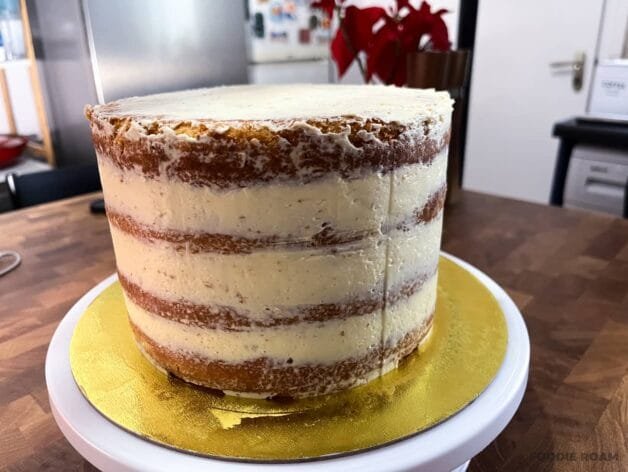
Once baked, remove the pans from the oven and let the cakes cool in their pans for about 10 minutes. Carefully turn them out onto a wire rack and allow them to cool completely before moving on to assembly. Warm cake layers can cause the buttercream to melt and become unstable, so patience is key here.
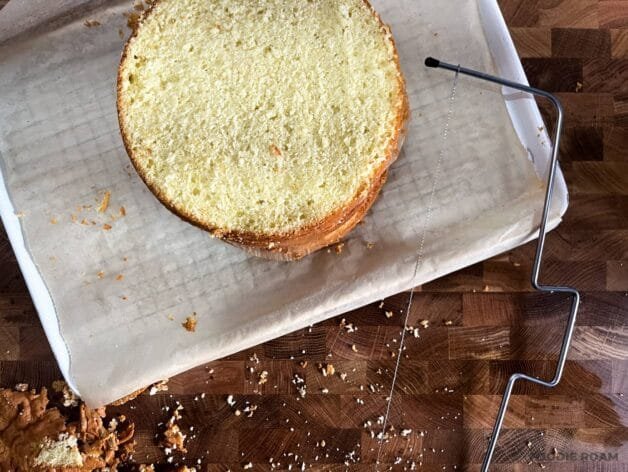
Once fully cooled, use a cake leveler to trim the caramelized top layer of each sponge. This step ensures even layers of uniform thickness, providing a stable and level foundation for stacking and decorating your cake.
Step 6: Prepare the Almond Mascarpone Swiss Meringue Buttercream
Step 6.1: Dissolve the Sugar in Egg Whites
In a heatproof mixing bowl (or the bowl of your stand mixer if heatproof), combine 8 large egg whites and 2½ cups caster sugar (500 g). Place the bowl over a pot of simmering water (bain-marie), ensuring the water doesn’t touch the bottom of the bowl.
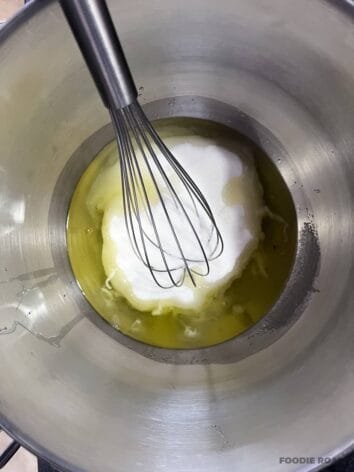
Whisk the mixture continuously until it reaches 160°F (70°C) and the sugar has completely dissolved. You can test this by rubbing a small amount between your fingers—it should feel smooth with no sugar granules remaining.
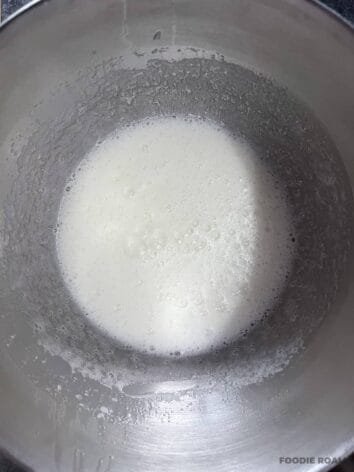
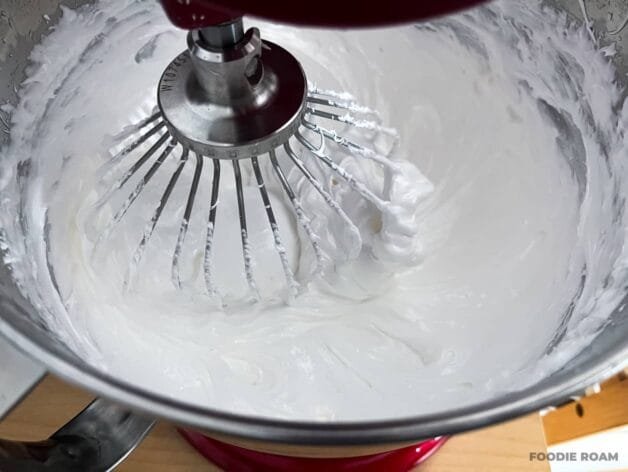
Step 6.2: Whip the Meringue
Transfer the bowl to your stand mixer fitted with the whisk attachment. Whip the egg white mixture on high speed for about 10-15 minutes, or until stiff, glossy peaks form and the bowl feels cool to the touch. Properly whipped meringue provides the structure needed for the buttercream to hold its shape.
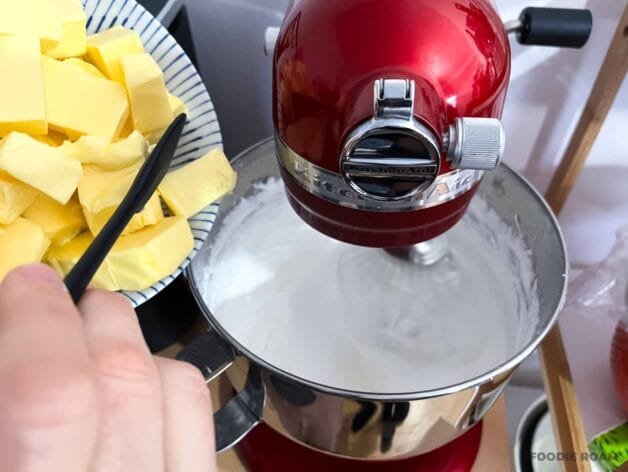
Step 6.3: Add the Butter Gradually
Reduce the mixer speed to medium speed and begin adding 3 cups of soft unsalted butter (680 g), one cube at a time. It’s essential that the butter is softened to room temperature—not melted or overly firm—to ensure it blends smoothly into the meringue without creating lumps or causing the mixture to split.
Add each cube patiently, allowing it to be fully incorporated before adding the next. At first, the texture of the buttercream might look slightly loose or curdled, but don’t worry—this is completely normal. Keep mixing steadily, and the buttercream will gradually transform into a silky, smooth, and stable texture.
If the buttercream remains too soft after all the butter has been added, place the bowl in the refrigerator for about 15 minutes, then whisk briefly to restore its structure.
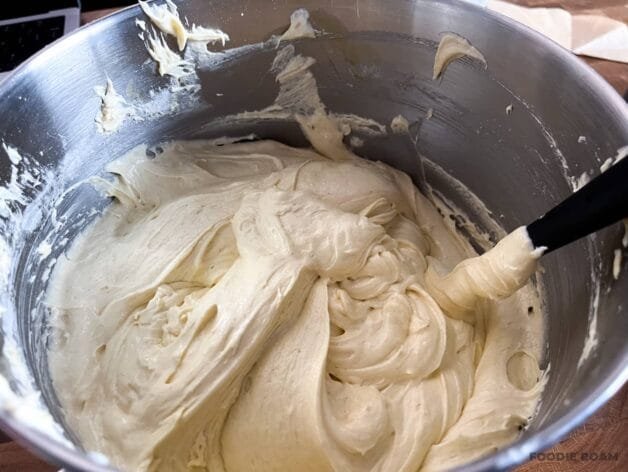
At this stage, the buttercream should be light, creamy, and stable, perfectly prepped for the addition of mascarpone and flavorings in the next step.
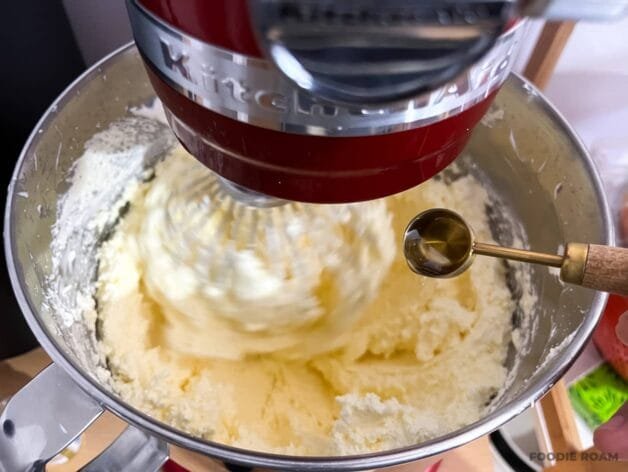
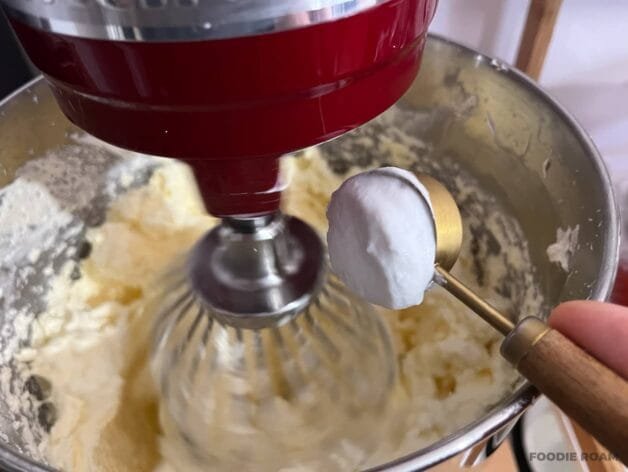
Step 6.4: Add Mascarpone and Flavorings
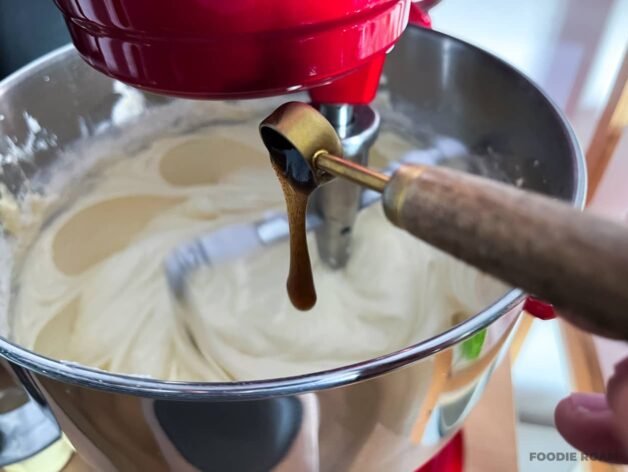
Reduce the mixer speed to low speed and add 1 cup cold mascarpone cheese (250 g), one spoonful at a time, mixing gently until fully incorporated. Then add ½ teaspoon almond extract, 6 tablespoons coconut milk (90 ml), and ¼ teaspoon salt. Mix just until smooth and evenly combined.

The buttercream should now be silky, light, and perfectly balanced in flavor, ready for assembling and decorating your cake.
Step 7: Assemble the 4-layer Cake
Before starting the assembly, set aside about 10–15% of the almond mascarpone buttercream for decoration. It’s best to separate this portion in advance and place it in a clean bowl, ensuring you have enough reserved for final touches and piping details later.
Start by placing a small dab of buttercream in the center of your cake stand to secure the first sponge layer and keep it stable during assembly. Place the first sponge layer on top and press gently to adhere it to the base.
Using an offset spatula, spread an even layer of almond mascarpone buttercream over the first sponge. Aim for a layer about ½ inch (1 cm) thick, ensuring an even distribution without excess cream spilling over the edges.

Repeat the process with the second, third, and fourth sponge layers, applying an even layer of buttercream between each. Carefully align the layers to keep the cake level, pressing lightly to ensure stability without compressing the sponges.
Once all the layers are stacked, apply a thin crumb coat over the entire cake to trap any loose crumbs and create a smooth base. Use an offset spatula to spread the buttercream evenly across the top and sides, then smooth it with a bench scraper for clean edges.
Place the cake in the refrigerator for 20 minutes to set the crumb coat before applying the final layer of buttercream. This step ensures stability and makes the final coating much easier to apply.
Step 8: Apply the Final Coat of Buttercream
Once the crumb coat has set in the refrigerator, remove the cake and place it back on the turntable. Using an offset spatula, apply a generous amount of almond mascarpone buttercream to the top and sides of the cake. Start by spreading the buttercream evenly across the top, then work your way down the sides, ensuring full and consistent coverage.
Hold a bench scraper at a slight angle against the side of the cake while slowly rotating the turntable. This helps create a smooth, polished finish. Use the offset spatula to clean up the top edges, gently smoothing any excess buttercream inward for sharp corners.
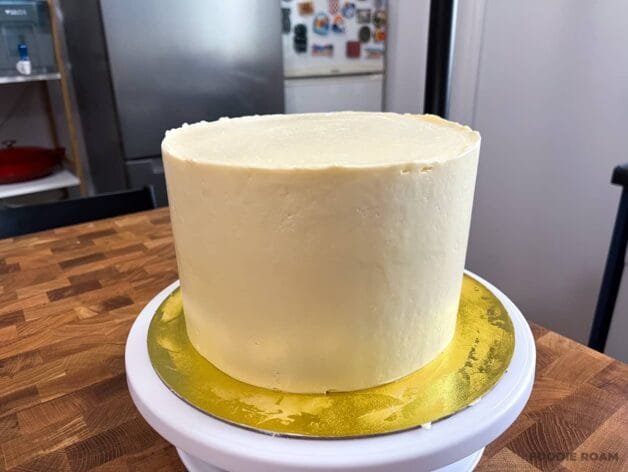
Take your time with this step—the smoother the final coat, the more professional your cake will look. If needed, chill the cake briefly to firm up the buttercream before moving on to decoration.
The cake should now have clean edges and a smooth, even finish, ready for the final decorative touches.
Step 9: Decorate the Cake
With the reserved almond mascarpone buttercream set aside earlier, prepare a piping bag fitted with a star tip. Tint a portion of the buttercream green using gel food coloring to create a festive design.
Start by piping a large Christmas tree design on one side of the cake. Work from the bottom upward, using small star patterns to create the texture of tree branches. Add smaller buttercream trees on the top of the cake to complement the design.
Decorate the trees with colorful sprinkles to mimic ornaments, and place a star anise at the top of the central tree for an elegant finishing touch.
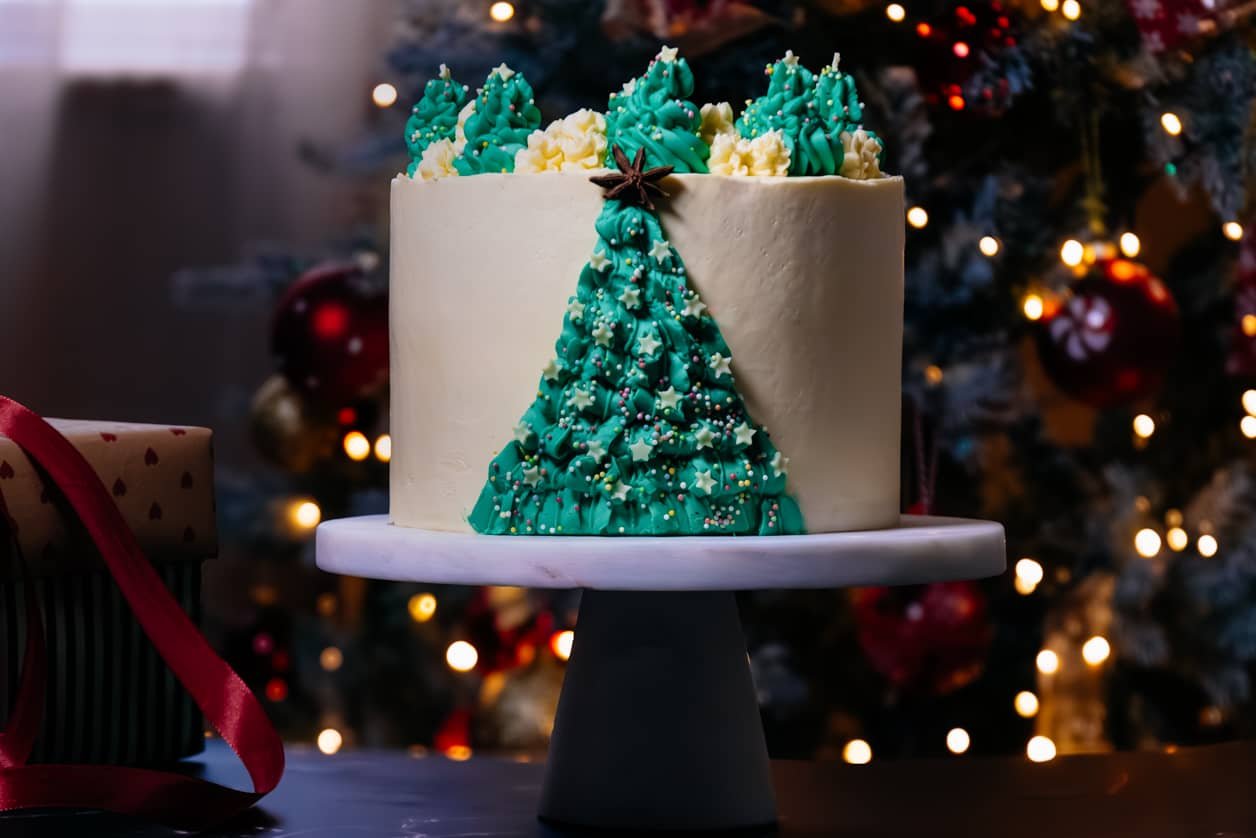
Take a final look at your cake, smooth out any imperfections, and make any final adjustments to the decorations.
Once complete, chill the cake briefly to set the decorations before serving.
Step 10: Serve the Cake
Before serving, allow the cake to sit at room temperature for about 30 minutes. This will soften the buttercream slightly and ensure the flavors are at their best. Using a sharp, serrated knife, carefully slice the cake. Wipe the blade with a clean, damp cloth between cuts to maintain clean, precise slices.
Serve each slice on a dessert plate, optionally garnished with a sprinkle of toasted coconut flakes or a light dusting of powdered sugar for added elegance. Pair it with a warm drink like an almond latte or coconut hot chocolate for the perfect finishing touch.
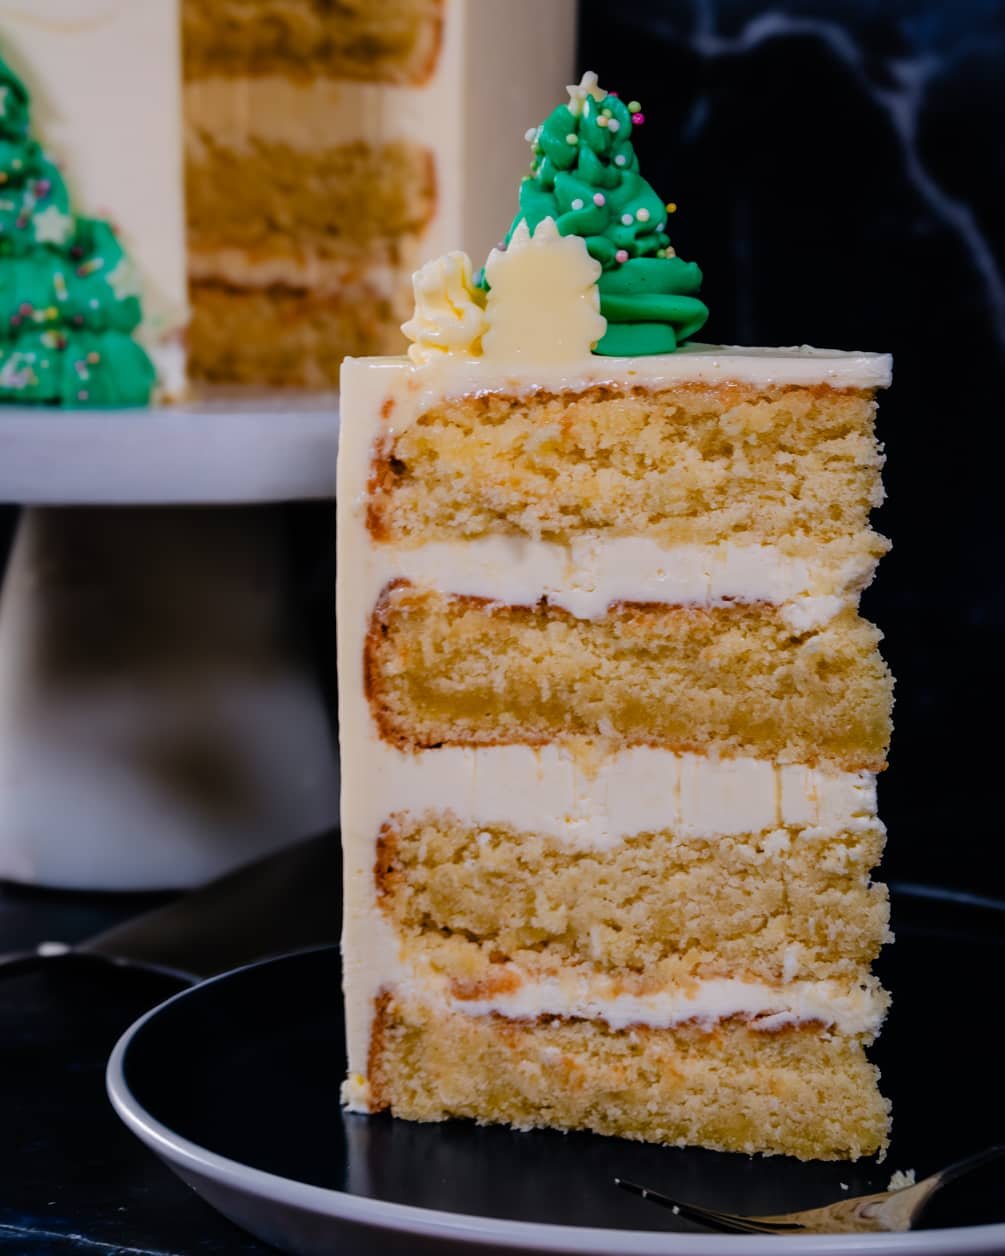
Take a moment to admire the layers—the tender coconut sponge paired with silky almond mascarpone buttercream—and savor each bite.
Creative Decoration Ideas for Your Coconut Almond Cake
Take your Coconut Cake with Almond Mascarpone Buttercream to the next level with these eye-catching decoration ideas. Whether you’re aiming for a festive centerpiece or a more understated elegance, these suggestions will add personality and style to your creation:
- Toasted Coconut Flakes: Lightly sprinkle toasted coconut around the base or across the top for a rustic, textured finish.
- White Chocolate Drizzle: Add a delicate drizzle of melted white chocolate over the top and let it cascade down the sides for a luxurious touch.
- Fresh Berries: Scatter fresh raspberries, blueberries, or strawberries on top for vibrant pops of color and a refreshing contrast.
- Edible Flowers: Decorate with delicate edible flowers for a sophisticated and natural aesthetic.
- Metallic Accents: Use edible gold or silver dust to highlight piped details or gently brush across the buttercream for an elegant shimmer.
Whether you keep it simple and refined or go for a bold festive theme, these creative touches will ensure your cake looks as impressive as it tastes.
Storage and Make-Ahead Tips for Your Coconut Almond Cake
Keep your Coconut Cake with Almond Mascarpone Buttercream fresh and flawless with these quick storage and make-ahead tips:
If refrigerating, store the cake in a cake carrier or under a cake dome for up to 5 days. Allow it to sit at room temperature for 20–30 minutes before serving.
Sponge layers can be baked ahead and frozen for up to 3 months if wrapped tightly in plastic wrap and aluminum foil. Thaw overnight in the fridge before assembling.
The buttercream can be made up to 2 days ahead and stored in an airtight container in the fridge. Bring it to room temperature and re-whip before use.
For partially assembled cakes, crumb coat and chill overnight, then finish decorating on the day of serving.
These simple tips will help you plan ahead and keep your cake fresh, stable, and presentation-ready without any stress.
A Sweet Ending: Bringing Layers of Flavor to Life
Every slice of this cake tells a story—of tender coconut sponge, silky almond mascarpone buttercream, and the care poured into each layer. It’s more than just a dessert; it’s a moment shared, a centerpiece admired, and a bite savored.
Whether you’re celebrating a special occasion or simply treating yourself and your loved ones, this cake is a testament to how simple ingredients, handled with care and creativity, can create something truly extraordinary.
Now it’s your turn to bring these flavors to life. Follow the steps, trust the process, and most importantly, enjoy every moment of creating—and sharing—this beautiful cake.
Have you tried your own version of this Coconut Almond Cake? Do you have a favorite decoration style or a special twist you added to the recipe? Share your thoughts in the comments below, or tag your beautiful creation with #FoodieRoam on Instagram. I’d love to see how you brought this festive dessert to life!
Ingredients
Servings12 slices
Coconut Sponge:
- 1½ cups (330 g) unsalted butter (softened)
- ⅔ cup (135 g) vegetable oil
- 2½ cups (500 g) caster sugar
- 8 large eggs (room temperature)
- 3¼ cups (400 g) self-raising flour (sifted)
- Pinch of salt
- 2 cups (200 g) desiccated coconut
- 10 tbsp (150 ml) coconut cream
- ½ tsp vanilla extract
Almond Mascarpone Buttercream:
- 8 large egg whites
- 2½ cups (500 g) caster sugar
- 3 cups (680 g) unsalted butter (softened)
- 1 cup (250 g) mascarpone cheese (cold)
- ½ tsp almond extract
- 6 tbsp (90 ml) coconut milk
- ¼ tsp salt
Decoration:
- Reserved buttercream 10–15% of total
- Green gel food coloring
- Sprinkles
- Star anise
What will you need?
- Stand Mixer
- 4 8-inch (20 cm) round cake pans
- Offset spatula
- Bench Scraper
- Piping bag with star tip
- Cake turntable
- Heatproof mixing bowl
- Cake leveler
Have you cooked this?
Mark as cooked!
1 users marked recipe as cooked
Prep time45 minutes
Cook time25 minutes
Cook time45 minutes
Total time1 hour 55 minutes
Instructions
- Preheat the oven to 340°F (170°C). Grease and line four 8-inch (20 cm) round cake pans with parchment paper. In a stand mixer, beat butter, oil, and sugar until pale and fluffy. Add eggs one at a time, mixing well after each addition. Add sifted flour, salt, and coconut, mixing on low speed. Slowly pour in coconut cream and vanilla extract until just combined.
- Divide the batter evenly between the prepared pans and use an offset spatula to smooth the tops. Bake for 20–25 minutes, or until a toothpick inserted into the center comes out clean. Let the cakes cool in their pans for 10 minutes, then carefully turn them out onto a wire rack to cool completely. Once cooled, use a cake leveler to trim the caramelized top layer of each sponge, ensuring even and level layers for stable assembly.
- Combine egg whites and sugar in a heatproof bowl over a bain-marie. Whisk constantly until the mixture reaches 160°F (70°C) and the sugar is dissolved.
- Transfer the bowl to a stand mixer with the whisk attachment. Whip on high speed until stiff, glossy peaks form and the bowl feels cool to the touch.
- Reduce the mixer speed to medium. Add softened butter one cube at a time, allowing each cube to fully incorporate before adding the next. Continue mixing until smooth and silky.
- On low speed, mix in mascarpone cheese, almond extract, coconut milk, and salt until smooth and evenly combined.
- Set aside 10–15% of the buttercream for decoration. Spread a thin layer of buttercream on the cake stand to secure the first sponge layer. Layer the sponges with ½ inch (1 cm) thick layers of buttercream between each. Apply a thin crumb coat, smooth it out, and refrigerate for 20 minutes.
- Spread the remaining buttercream evenly over the top and sides of the cake. Use an offset spatula and bench scraper to achieve a smooth finish.
- Tint the reserved buttercream green and use a piping bag with a star tip to create tree designs. Decorate with sprinkles and a star anise topper. Chill briefly to set the design.
- Let the cake sit at room temperature for 20–30 minutes before slicing. Serve each slice with a warm drink like almond latte or coconut hot chocolate.
Our notes
Ensure all ingredients are at room temperature unless stated otherwise.
Avoid overmixing the batter once dry ingredients are added to maintain a light sponge texture.
When making Swiss Meringue Buttercream, ensure no water or grease touches the meringue mixture to prevent it from collapsing.
Set aside 10–15% of the buttercream for decoration before assembling the cake.
Allow the cake to sit at room temperature for 20–30 minutes before slicing and serving for the best texture and flavor.